

Key Takeaways
Why Checking Your Own Fluids Is Worth the Effort
Routine fluid checks are one of the simplest, most cost-effective habits a car owner can develop. Fluids degrade, evaporate, and - in some cases - signal larger mechanical problems when they run low. Catching an issue early during a 15-minute driveway inspection can prevent an expensive repair bill down the road. It also means you arrive at any shop visit with real information rather than relying entirely on a service writer's assessment.
For families managing a tight budget, this kind of informed ownership pays off. You'll know when something genuinely needs attention and when you can wait until your next scheduled service. As part of a broader routine, fluid checks pair naturally with the intervals described in our family car maintenance schedule guide.
What you will need
Before you start, glance through the terminology you'll encounter. Our plain-language maintenance glossary covers terms like viscosity, hydraulic fluid, and coolant flush so nothing under the hood catches you off guard.
What You'll Need
No special equipment is required for most fluid checks. The items below are either standard household supplies or low-cost additions to a basic car kit.
Lint-free shop rag or paper towels
Used to wipe dipsticks clean before taking an accurate fluid level reading.
Flashlight or phone torch
Illuminates dark areas of the engine bay so reservoir markings and fluid colors are clearly visible.
Vehicle owner's manual
Provides exact reservoir locations, fluid specifications, and correct fill levels for your specific vehicle.
Nitrile or latex gloves
Protects hands from engine oil, brake fluid, and coolant, all of which can irritate skin.
Small funnel
Helps add fluid to reservoirs with narrow openings without spilling onto engine components.
Step-by-Step: Reading Each Fluid
Never Open a Hot Coolant Reservoir
The cooling system operates under pressure. Opening the radiator cap or coolant reservoir cap while the engine is warm or hot can cause scalding steam and coolant to erupt. Always wait at least 30 minutes after switching off the engine before checking coolant. If in doubt, leave it until the engine is completely cold.
Prepare the vehicle and gather your tools
Park on a flat, level surface and switch off the engine. Gather your rag, flashlight, gloves, and owner's manual. A level surface is essential - if the car is tilted, dipstick and reservoir readings will be inaccurate. Wait at least 10-15 minutes before starting; some checks require a longer cooling period.
Check the engine oil
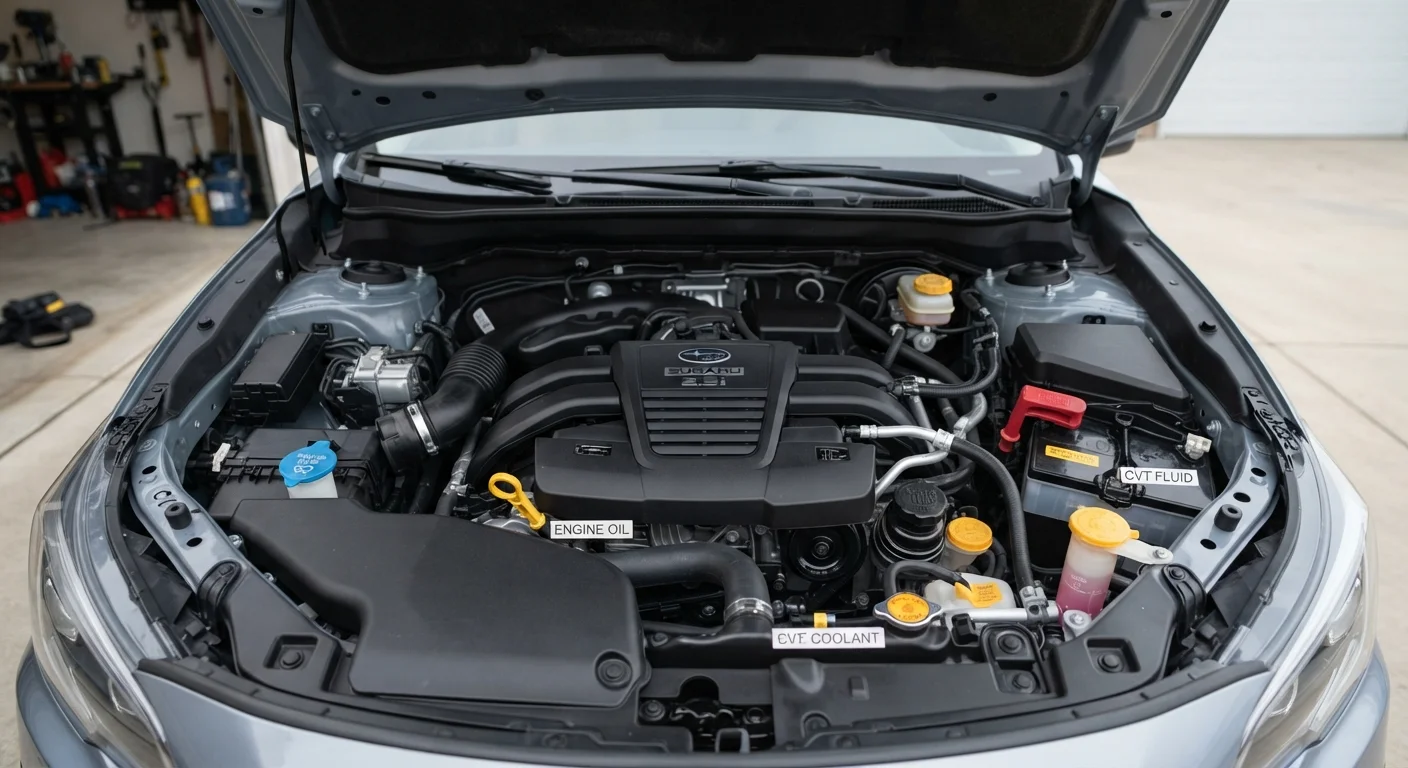
Locate the oil dipstick - it typically has a brightly colored (yellow or orange) ring handle and is labeled with an oil-can symbol. Pull it out fully, wipe it clean with your rag, reinsert it all the way, then withdraw it again. The oil should sit between the two notches or hash marks at the bottom of the dipstick. Healthy oil is amber to light brown. Very dark, gritty, or milky oil warrants attention.
Check the coolant (antifreeze) level
The coolant reservoir is a semi-translucent plastic tank, often with MIN and MAX lines printed on the outside. You can read the level without opening it. The fluid should be between the two lines. Coolant is typically green, orange, or pink depending on the type - check your owner's manual for the correct type before adding any.
Check the brake fluid
The brake fluid reservoir is a small, capped plastic container near the back of the engine bay on the driver's side, connected to the brake master cylinder. Most are translucent enough to read without opening. Look for the MIN and MAX markings. Healthy brake fluid is nearly clear to light yellow. Dark brown fluid suggests it's absorbed moisture over time and may need to be flushed by a professional.
Check the power steering fluid (if applicable)
Many newer vehicles use electric power steering and have no fluid to check. If your car has hydraulic power steering, the reservoir - typically labeled with a steering wheel icon - has either a dipstick attached to the cap or MIN/MAX lines on the side. The process mirrors the oil dipstick: wipe, reinsert, read. Low power steering fluid combined with a whining noise when turning is a sign worth discussing with a mechanic.
Check the transmission fluid (automatic transmissions)
Some automatic transmissions have a dipstick - often red-handled and located toward the rear of the engine bay. Others are sealed from the factory and require a professional to check. If a dipstick is present, the procedure is similar to engine oil: engine warm and running (consult your manual - some require the engine off), wipe, reinsert, read. Healthy transmission fluid is red or pinkish. Brown or burned-smelling fluid signals it's overdue for service.
Check the windshield washer fluid
The washer fluid reservoir is typically a large translucent or blue-capped container. This is the one fluid you can safely add yourself without concern for vehicle damage - it is simply a mixture of water and a cleaning agent. Keep it topped up, especially before winter or road trips. Do not substitute plain water in freezing climates, as it will freeze in the lines and reservoir.
Low Brake Fluid May Signal a Serious Problem
Brake fluid doesn't burn off like fuel - a noticeably low level almost always means there is a leak somewhere in the hydraulic system, or brake pads are severely worn. Do not simply top it off and drive on. Have a qualified mechanic inspect the brakes before driving the vehicle further. See our guide on brake wear warning signs for more context.
What the Results Tell You - and When to Call a Professional
A single low reading isn't always cause for alarm, but patterns matter. If you find yourself topping off the same fluid repeatedly, that fluid is going somewhere - either burning off (engine oil on a high-mileage engine) or leaking. Look for spots on the driveway or garage floor as a secondary clue. Coolant puddles are often sweet-smelling; oil puddles are darker and greasy.
Keep Your Owner's Manual Handy
Your vehicle's owner's manual lists the exact fluid specifications, reservoir locations, and acceptable level ranges for your specific model and year. When in doubt, the manual is always the authoritative reference - not generic online guides. Most automakers also make digital versions available through their websites.
Color and smell are your two best diagnostic tools without any equipment. Any fluid that looks foamy, milky, or carries a burnt odor deserves a professional opinion. A comprehensive overview of roadworthy car maintenance can help you understand how fluid health connects to brakes, tires, and other systems. And if you're preparing for a longer drive, use the checklist from what mechanics check before a road trip to make sure nothing is overlooked.
This article provides general educational information about vehicle maintenance. It is not a substitute for advice from a qualified mechanic. Always consult a licensed professional if you are uncertain about your vehicle's condition or safety.