

Key Takeaways
Why Mulching Goes Wrong More Often Than You'd Think
Mulch is genuinely one of the most cost-effective tools a home gardener has. A layer of organic material over your soil suppresses weeds, holds moisture, moderates soil temperature, and gradually feeds soil life as it breaks down. It sounds simple - and it is, when done right. But a surprising number of garden problems trace back to mulching errors rather than pests, drought, or poor soil.
The good news is that these mistakes are easy to recognize and correct once you know what to look for. Whether you're managing a backyard garden bed, a vegetable patch, or foundation plantings, the same principles apply. See our guide to improving garden soil for context on how mulch fits into a broader soil health strategy.
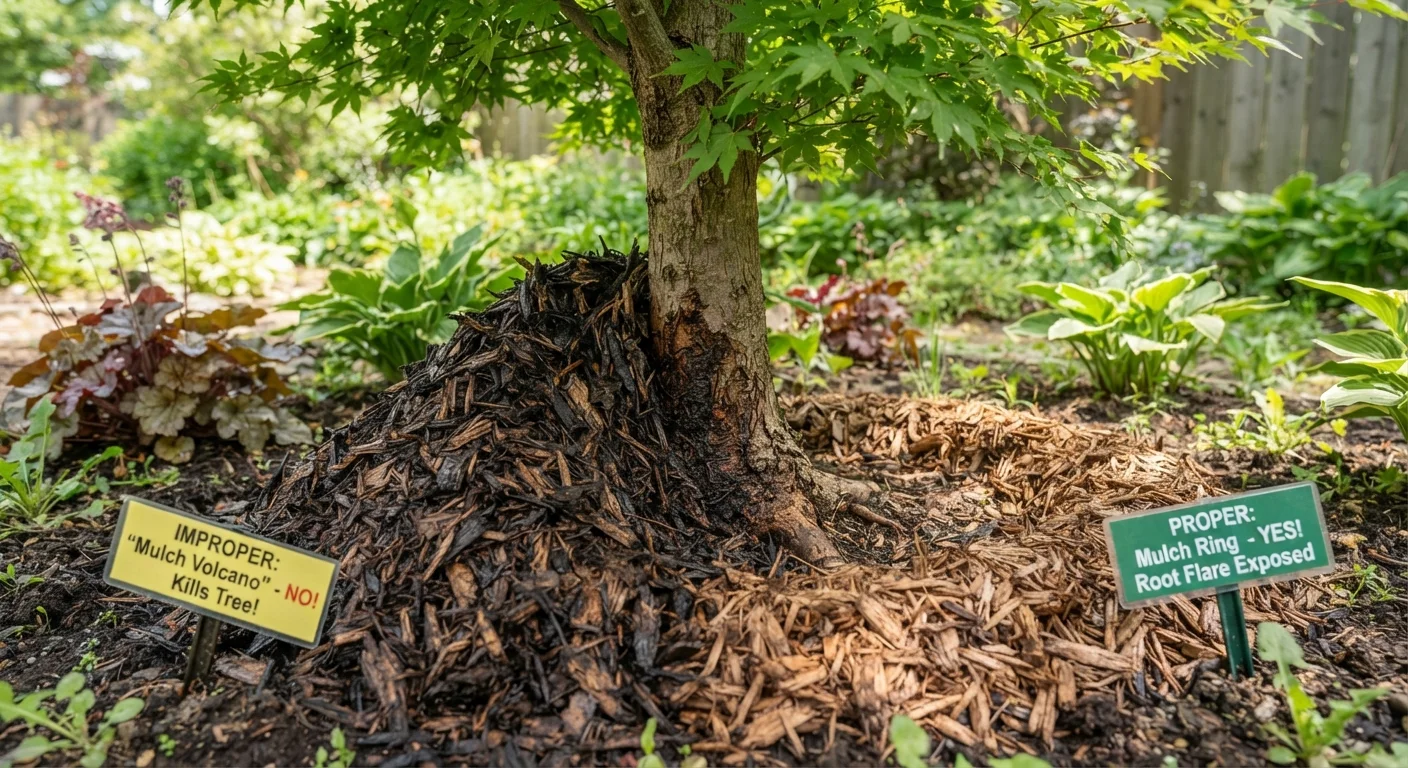
Piling mulch directly against plant stems or tree trunks - the so-called 'volcano mulch' habit.
Why it happens: It looks tidy and feels protective, and bagged mulch instructions rarely warn against it. Many gardeners assume more coverage equals more benefit.
Applying mulch too deep - more than 3 to 4 inches in most garden beds.
Why it happens: Deeper feels better to many gardeners, and when weeds push through a thin layer it's tempting to just add more on top year after year.
Using the wrong type of mulch for the plants in that bed.
Why it happens: Most garden centers sell a few standard options, and it's easy to assume any mulch works everywhere. Pine bark and pine needles, for instance, are mildly acidic and suit azaleas or blueberries but can stress plants that prefer neutral soil.
Applying mulch over dry soil without watering first.
Why it happens: The assumption is that mulch will help retain whatever moisture is there - but if the soil is already dry, a thick layer can actually repel rainfall and irrigation, causing water to run off the surface rather than penetrate.
Leaving mulch in place year after year without refreshing or checking for compaction.
Why it happens: Once mulch is applied, it tends to become invisible maintenance - gardeners forget it's there until problems appear.
Mulching too close to the edge of a bed, allowing it to spill onto grass or paths where it causes its own problems.
Why it happens: Filling beds to the brim looks neat right after application but settling and rain movement cause spread over time.
How to Mulch Effectively All Season Long
Getting mulching right isn't complicated, but it does require attention to timing and placement. Apply mulch in spring after the soil has warmed - putting it down too early traps cold and delays plant growth. In fall, a fresh layer before the first frost helps insulate roots through winter. The fall garden cleanup checklist covers this step alongside other end-of-season tasks.
Watch Out for 'Mulch Volcanoes' Around Trees
Piling mulch high against tree trunks is one of the most widespread landscaping errors in residential yards. It traps moisture against the bark, encourages rot, and can eventually girdle the tree as roots grow into the mulch layer instead of the soil. Even a single growing season of volcano mulching can cause damage that takes years to show up as declining tree health.
Each season, rake back old mulch, check for matting or mold, and top up as needed rather than simply adding more on top. Decomposed mulch that has turned to dark, crumbly material is doing its job - it's feeding the soil. Fresh mulch goes on top in a managed, measured layer. This approach keeps beds looking tidy without the root damage that comes from years of buildup.
If your garden struggles with persistent pest pressure alongside mulching issues, it's worth also reviewing what's eating your garden - dense or poorly managed mulch can harbor insects that damage plants from the ground up.
2-3 in.
Ideal mulch depth for most garden beds
University cooperative extension programs generally recommend a 2-to-3-inch layer as the effective range for weed suppression and moisture retention without harming roots.
25-50%
Potential reduction in soil moisture loss
Research from various horticultural institutions suggests that a proper mulch layer can meaningfully reduce surface evaporation, reducing the need to water as frequently.
Mulching well is one of the simplest ways to reduce weekly watering needs and cut time spent weeding, both of which matter for families working with limited outdoor time and modest garden budgets. Paired with smart watering habits - see common watering myths to avoid - consistent mulching keeps more of your gardening effort working in your favor rather than against you.